
It is difficult to make new friends in your 30s. I know that to those of you in and past this phase of life have probably already figured this out, but bear with me a moment while I catch up. I’m just not as social as I used to be. In fact I find that I’ve developed a social awkwardness that I don’t remember having in my 20s. Maybe it’s because most of my social interactions then were at a bar, drink in hand?
In any case, I find I still have the human need for friends, but am less adept at interacting with strangers than I once was. So, one solution to this has been to seek out structured activities where I am thrust into the presence of other people, but do not have to make a lot of conversation with them right off the bat. Knitting class, writing workshop, author readings, gardening class, and one class about sprouting. Yes, a class about DIY sprouting given at the local co-op. How’s that for being a crunchy Oregon hippie?!

I didn’t make any friends at the class, but I did learn a lot of fascinating things about sprouting and I have been hooked on it ever since. It turns out there is a lot more to sprouts than the alfalfa variety that I remember from my youth, and that I hated. You can sprout nuts, beans, lentils, seeds, grains, the possibilities are endless! Or nearly so.
And there are some convincing health benefits, at least I find them convincing, that have to do with all the nutrients locked up in the seed of a plant (which is, of course, what all the aforementioned things are). When you sprout a bean or a nut, you release all the protein and vitamins that it was storing to help it grow into a strong, healthy plant. Sprouts are also delicious, and have very different flavors depending on what you are sprouting – something that surprised me because my sprout experience had been limited to the alfalfa variety.

My favorite sprouts so far, and the ones that have been the most consistently successful, are lentil sprouts. So, they are the sprouts featured in today’s recipe. I have also had a few challenges, though, and one sprouting disaster – lest you think my sprouting glasses are a little too rose-colored. The disaster was self-inflicted, really, and involved an attempt to sprout garbanzo beans that I knew were way too old to do anything with other than use as pie weights. Pro tip: if beans are too old to cook, they are too old to sprout.

For the most part though, sprouting has been smooth-sailing, delicious, and nutritious. This recipe is by far my favorite that has incorporated lentil sprouts, but they are supremely versatile. They add a wonderful texture and flavor to salads, sandwiches, or as a topping for just about any quinoa or other grain salad.

Carrot, Avocado, Sprout Salad over Quinoa
Barely adapted from DailyCandy (RIP)
Makes four good-sized portions, good for lunch or dinner
Directions for lentil sprouts are below this recipe, but heads up: it takes about 3 1/2 to 4 days to sprout lentils. So, if you want to make this recipe, you best get sprouting!
- 1 cup uncooked quinoa, rinsed
- 4 medium carrots, peeled and cut into 3-inch chunks
- 3 garlic cloves
- 1 teaspoon cumin seeds
- 1 teaspoon fresh thyme (or 1/2 teaspoon dried)
- ¼ teaspoon crushed red chili flakes
- Salt and pepper
- 1 tablespoon red wine vinegar
- ¼ cup, plus 2 tablespoons extra virgin olive oil, divided
- 4 tangerines (I used Cuties), halved
- 2 lemons, halved
- 1 avocado, pitted, peeled, and sliced
- 4 cups lentil sprouts (directions below)
- a couple dollops of sour cream
- 3 tablespoons mixed seeds (I used pumpkin, sunflower, and sesame, but you could use any seeds you want), toasted
Combine quinoa, 2 cups water, and a pinch of salt in a saucepan and bring to a simmer. Turn heat down to just what is needed to maintain the simmer and cook until all water is absorbed and quinoa is fluffy, 15-20 minutes.
While quinoa is cooking, turn the oven on to 350° and put a large pot of water on to a boil. When the water is boiling, add the carrots and cook until a knife pierces them easily, about 20 minutes.
Meanwhile, combine the garlic, cumin, thyme, chili, 1½ teaspoons salt, and ¾ teaspoon pepper in a food processor and pulse until pasty. With the food processor running, add the vinegar and ¼ cup of the olive oil and run until well-mixed. Set aside.
When the quinoa is done, set it aside. When the carrots are done, drain and then arrange them in a single layer on a sheet pan. Spoon the cumin/olive oil mixture over the carrots.
Cut 3 of the tangerines and 1 lemon in half and place them on top of the carrots, cut-side down. Roast in the oven for 25 minutes or until carrots are golden brown.
When cool enough to handle, squeeze the juice from the roasted tangerine and lemon halves into a small bowl. Squeeze in the juice each from the remaining uncooked tangerine and lemon. Whisk in the remaining 2 tablespoons olive oil. Season with salt and pepper to taste and drizzle about half over the roasted carrots, reserving the rest.
To assemble the dish, start with a scoop of the quinoa and top with saucy carrots, then avocado, then sprouts. Drizzle with reserved sauce, add a dollop of sour cream to the top, and then sprinkle with toasted seeds. Serve immediately.
Lentil Sprouts
Directions from Susan Hyne, who taught the sprouting class
Makes ~4 cups
- 1/4 cup lentils (I used Puy lentils, but you could use Beluga, brown, red, yellow, etc.)
- 1 quart glass jar with a screw top lid
- cheesecloth
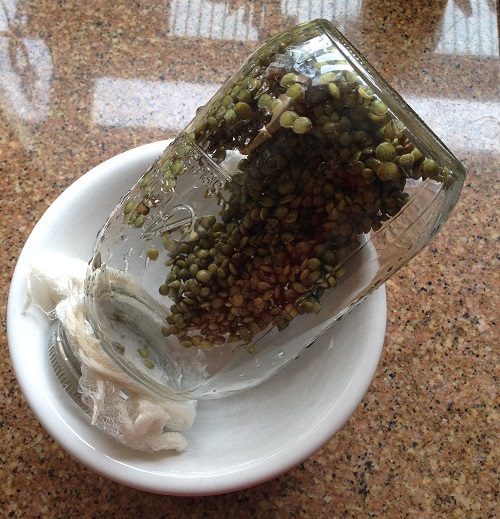
Rinse lentils in a sieve and then dump into the glass jar.
Fill the jar with water. Cover the opening of the jar with a 2-ply piece of cheesecloth and then screw lid on to hold cheesecloth in place.

Cover the jar with a kitchen towel to keep out light and soak lentils for 12 hours.
After the lentils have soaked, drain the water and rest jar in a small bowl so that it’s tilted and any remaining water can drain out. Re-cover with the kitchen towel.
Rinse the lentils and the bowl well 2-3 times per day for 3-4 days, each time returning the jar to the bowl so that the lentils can drain and covering with the towel.

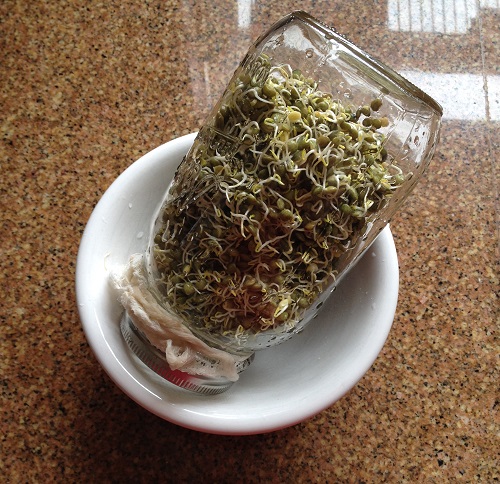

The sprouts are ready when they are about 1-inch long.
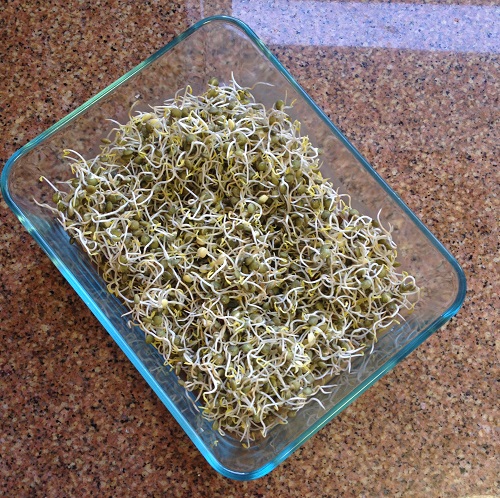
Eat right away or store in the fridge. If you are storing in the fridge, do not rinse right before putting them in the fridge (i.e. you want them to go into the fridge as dry as possible to keep them from getting slimy). If you put them in the fridge dry, they will keep for up to 4 days.


 Last week, I was lucky enough to be given a box of produce as part of The Oxbow Box Project.


