Tag Archives: greens

The beauty of an unplanned meal

I am a planner. I like to organize things and catalog them and plot them out on a timeline if they will let me. I am a librarian, after all. At work I have a master To Do list on my computer that is then broken up into sub-lists, including To Do This Week, To Do This Term, To Do This Summer, you get the idea. I also have a Projects list on a whiteboard in my office, just in case my other lists distract me from what’s really important.

This extends to my personal life as well, and definitely to my kitchen. I have a list of my goals for the year next to my bed, so that I can read them every night and stay motivated. I never (well, hardly ever) go to the grocery store before planning out the week’s meals and making a list. When I first started cooking, I always, always followed a recipe. It didn’t even occur to me, in fact, that there was any other way. And I liked how following a recipe gave me a consistent, predictable result.

Thankfully, I have learned by now that so much of cooking is unplanned. It’s about tasting and adjusting and customizing. Especially since we’ve moved to the Pacific Northwest where there is so much fresh, local produce, I have embraced seasonal cooking, which means you have to be ready to do what you can with what you’ve got at any given time of year. I encountered a perfect example of this one weekend recently when David and I went to our first farmers’ market of the spring.

spring vegetables

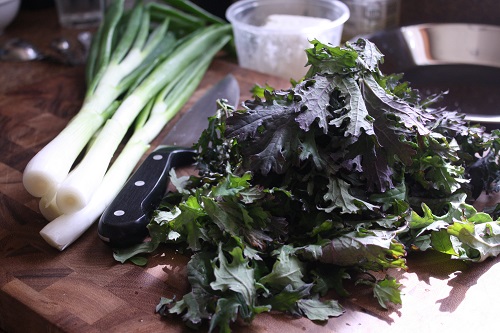
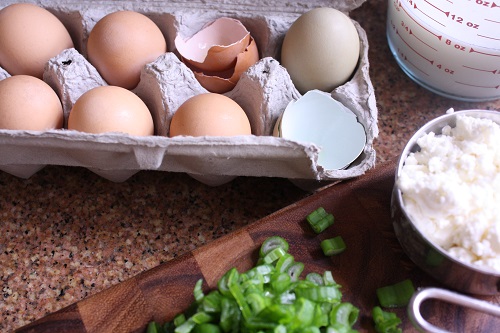
It is still indoors, in a warehouse-like building on the fairgrounds. The outdoor market won’t return until later this month, but spring was definitely making its presence known. The booths had more life, the whole place was humming, there were spring onions. Spring onions! They even have the word ‘spring’ in their name. So, of course, we bought some. We also gathered a hodge-podge of other vegetables, whatever spoke to us, as well as a dozen pullet eggs, which are the petite eggs of a hen under 1-year-old.

ingredients

I didn’t know what I was going to do with our random purchases and I started to feel a little Type-A panic about it. But when we got home and unpacked everything it became clear: a spring quiche was in order. It was the best kind of unplanned meal – fresh ingredients combining with a well-stocked pantry to create something delightful.

finished quiche

Hearty Farmers’ Market Quiche

Crust adapted from Joy the Baker, filling modeled on Two Peas and Their Pod
Makes one 9-inch quiche

In the spirit of spontaneity, I would be remiss if I didn’t mention that this recipe can be endlessly adapted and tinkered with. In fact, that’s what a quiche is for, in my opinion. Especially when it comes to what vegetables and cheese you use. You can use almost anything you can imagine. Just keep the proportions of vegetables and cheese to eggs and milk about what they are in this recipe and you will be sitting pretty.

Crust:

  • 1 cup all-purpose flour
  • 1/2 cup buckwheat flour
  • 3/4 teaspoon salt
  • 1 tablespoon sugar
  • 1/8 teaspoon baking powder
  • 4 tablespoons butter, cut into chunks and chilled or frozen
  • 1 tablespoon cream cheese, at room temperature
  • 2 tablespoons milk, chilled (I used 1%)
  • 1/4 cup vegetable oil

Filling:

  • 2 tablespoons olive oil
  • 1 bunch (about 4 cups) Russian kale, ribs removed and then chopped
  • 4 spring onions (white and green parts divided), chopped
  • 5 large eggs (or equivalent in pullet eggs)
  • 1 cup milk (I used 1%, use whatever you have on hand)
  • 3/4 cup crumbled feta cheese
  • Salt and pepper, to taste

First, prepare and prebake the crust:

In a medium bowl whisk together flours, salt, sugar, and baking powder. Add the butter pieces and cream cheese and work into dry mixture, using a pastry cutter or your fingers, until most butter and cream cheese bits are pea-sized.

Whisk together the milk and oil, and then add all at once to the flour and butter mixture. Combine wet and dry ingredients with a fork until the liquid is just incorporated. Do not overwork – the dough will not totally come together, it will stay sort of shaggy.

Dump the dough into a clean 9-inch pie pan and use your fingers to press the dough evenly into the bottom and up the sides. Try to get it as even as possible, but don’t worry about it too much – no one will ever see it!

Put the crust in the freezer for at least 20 minutes. Meanwhile, preheat the oven to 350°.

Once your crust is frozen, line it with foil and fill it with beans or some other pie weight. Bake for 8 minutes. Then remove pie weights and foil and bake for another 4-6 minutes until it starts to brown.

While the crust is baking, prepare the filling:

In a large skillet, heat olive oil over medium heat. Add kale and the white parts of the spring onions. Cook until kale is wilted, about 5 minutes. Remove from heat and stir in spring onion green parts, then set aside.

In a large bowl, whisk together eggs and milk, then stir in the feta. Season with salt and pepper, to taste.

When the crust is done prebaking and the filling is prepared, raise the oven temperature to 375°. Spread vegetable mixture over the bottom of the crust, and then pour in egg mixture.

Bake the quiche for 45 minutes or until quiche is set and the top is golden brown. Let stand for 10-15 minutes before serving.

Leave a comment

Filed under Breakfast, Food, Lunch, Main Course

Spring and spinach

Happy first day of spring! I am more excited than usual for its arrival this year. I am excited for spring every year, who isn’t? But this year the winter seems to have been longer, darker, more wearing. I’m sure this is all in my mind, but regardless, I am brimming now that spring has finally decided to show up.

spring flowers

One of the things that starts to happen in my kitchen when spring comes, and is fully ensconced as a policy by summer, is that the meals get simpler. The best spring and summer recipes involve less prep time, less cooking time, just less fuss all around. This suits my spring mood perfectly, since all of a sudden there are a million other things I’d rather be doing than standing over a hot stove (the opposite of how I feel in the winter, for the record!).

I want to plant an herb garden, for instance, and to ride my bike along that path by the river that I kept meaning to check out last summer. David and I are planning to hike and camp and swim in as many of the spots that new friends and acquaintances have described as the “best places” for such things around here as we can.

I’m looking to sit on patios – as many as I can find/get myself invited to – with a cold drink and a book, feeling the sun warm the back of my neck. It is my goal to have a picnic at every park in town and watch the dogs that will surely be at said parks run and play. I want to pick blueberries at one of the many fields that I pass on my drive to work, when the rows and rows of bushes that have been red and bare all winter become green and laden with fruit.

With all these plans, who has time to cook? Spring and summer produce is so glorious though, that I certainly wouldn’t want to forgo home-cooked meals during this time. That is where recipes like this Spiced Coconut Spinach come in. During this time of year I return again and again to old standbys like this one: recipes that I know by heart, that are quick, simple, consistently delicious, and that show off the season’s best fruits and vegetables.

mise en place

This spinach comes together in no time (seriously, 15 minutes from start to finish) and its flavors are dazzling – much more intense than you might expect. You can pair it with other spring and summer vegetables to your heart’s content. The original recipe pairs it with asparagus, which is lovely, and I imagine it would also meld well with zucchini, summer squash, corn, fresh peas, even green beans. 

It is also an ideal accompaniment for almost any starch or protein that you might be using to round out your meal. We generally eat it with brown rice, but it also tucks nicely into a pita and sits well atop a baked potato or a pile of pasta. The original recipe suggests folding it into an omelet, which is how I plan to eat it next.

Here’s to spring!

spiced spinach

Spiced Coconut Spinach

Adapted from 101cookbooks
Serves 2 as part of an entree, 3-4 as a side

  • 1 tablespoon olive oil
  • 1 shallot, chopped
  • 1 large garlic clove, minced
  • 1/4 teaspoon fine-grain sea salt
  • 1/4 teaspoon yellow mustard seeds
  • 1/2 teaspoon cumin seeds
  • 1/4-1/2 teaspoon red pepper flakes (depending on how spicy you like things)
  • 6 1/2 cups spinach (~7 oz.), washed and chopped (no need to chop if using baby spinach, but I’d recommend lovely, full, spring spinach!)
  • 1 cup summer vegetables, chopped (optional)
  • squeeze of lemon
  • 2 tablespoons unsweetened coconut flakes, lightly toasted

Heat the oil in a large sauté pan or skillet over medium heat. Add the cumin and mustard seeds and toast them until they start to pop. Then, add the red pepper flakes and cook for one more minute.

Add the shallot, garlic, and salt and cook until fragrant, 2-3 minutes.

Stir in the spinach and any other summer vegetables (i.e. quick cooking vegetables) you’re using. Stir frequently and cook for just a few minutes – until the spinach cooks down and any other vegetables are fork-tender.

Finish with a squeeze of fresh lemon juice and top with the toasted coconut.

Leave a comment

Filed under Food, Main Course, Sides

Ruminating on lunch

I recently reread The Wind in the Willows, which you may have seen if you follow me on Twitter because I’ve talked about it a lot. In addition to being just about the most charming, perfectly lovely book I’ve ever read (even better now that I’m an adult), it has several passages of really appealing descriptions of food.

One in particular, near the beginning when we are just starting to get a feel for the friendly, quirky animals that live in this pastoral world, started me ruminating on the topic of lunch:

“…after a short interval [he] reappeared staggering under a fat, wicker luncheon-basket… ‘What’s inside it?’ asked the Mole, wiggling with curiosity.
‘There’s cold chicken inside it,’ replied the Rat briefly; ‘cold tongue cold ham cold beef pickled gherkins salad french rolls cress sandwidges potted meat ginger beer lemonade soda water–‘
‘Oh stop, stop,’ cried the Mole in ecstasies: ‘This is too much!’
‘Do you really think so?’ inquired the Rat seriously ‘it’s only what I always take on these little excursions'”

The Wind in the Willows

Image from books4yourkids.com

Yes, I know I don’t even eat many of the things in Rat’s basket, but for some reason this scene just tickles me. And more to the point, it made me realize that I’ve managed, over the last couple years of grad school-induced austerity, to get into a pretty good habit of making my lunch and bringing it with me (to school, or now, work) as opposed to buying it every day like I did for so long. I am quite proud of this habit – and how often can you say that about a habit? – so it seemed like something worth sharing.

The recipe in my lunch repertoire that I’m most excited to talk about is for a lunch salad. Womp womp. Yes, I know, I know, but hear me out. The problem with lunch salads in my experience is that they are either too virtuous – vegetable-only affairs that leave you hungry, or too heavy – sure it has fried chicken, bacon, cheese, and ranch dressing in it, but it’s a salad! And neither of those are what I want for lunch. This salad is different though: it’s healthy yet filling, but not too heavy, and it has lots of different textures and flavors – veggies, protein, salty olives, crunchy pumpkin seeds, creamy avocado. In short, it’s the perfect lunch salad.

mix-ins

Oh sure, I’ll bring other things for lunch as well. I tend to bring leftovers from dinners during the week, mixed and matched together to create something new. Recently I tried this twist on a tuna salad sandwich and really liked it. While working on this post, I found that one of my favorite food websites put together a list of lunch recipes that take 5 minutes to pack, which I will definitely try out. But where my luncheon basket is concerned, I keep coming back to this salad. It hits all the right spots, and leaves me feeling both satisfied and healthy.

salad

An Ideal Lunch Salad

Adapted from 101cookbooks
Makes 4 lunch-sized salads

The key to getting this salad (or any salad, really) to work with me is prepping it ahead of time. So, on weeks that I want to have this salad for lunch, I spend 10-15 minutes on Sunday evening to get it ready. Assuming you may want to do the same, my instructions below are for this scenario. If you are making this salad for lunch on a weekend, or perhaps a leisurely picnic, then you could obviously prep and mix it all up at once – just make sure to wait on the dressing until right before serving, as with most salads.

Mix-ins:

3 celery stalks, thinly sliced
1 small head of broccoli, chopped into florets
1 14 oz can of chickpeas, drained and rinsed
15 kalamata or niçoise olives, chopped

Toppings:

1/3 cup pumpkin seeds, toasted
1 small ripe avocado, sliced

Dressing:

1 tablespoon white miso
1 tablespoon mirin
1 tablespoon brown rice vinegar
1/4 teaspoon ground cumin
1/3 cup plain yogurt
1-2 tablespoons (depending on how loose you like your dressing) water or any type of unsweetened milk
a pinch of salt (or more, to taste)

Greens:

2-3 handfuls of whatever greens you prefer (I’ve tried it with spinach, romaine, arugula, mixes – you can’t go wrong)

Prep

Steam the broccoli for about 4 minutes – until it is fork tender, but not mushy.

In a large container, combine all the mix-ins and store in the fridge until ready to assemble your salad.

Toast the pumpkin seeds and store in a separate container on the counter.

Make the dressing by whisking together all the ingredients until smooth. Adjust the consistency to your liking by adding as much of the milk/water as desired. Taste, and adjust the seasoning if needed. Store the dressing in a glass container in the fridge.

Assembly

In a med-large container (I use one that holds 1 quart), first lay down a bed of greens. On top of the greens, scoop about 2/3 cup of the mix-ins. Top with 1/4-1/2 of an avocado. (I store the other half of the avocado – pit still in it! – in a container in the fridge and it keeps just fine for a day or two).

Bring the toasted nuts and the dressing with you to work. When you are ready to eat lunch, top the salad with about a tablespoon of toasted seeds and as much dressing as you like. Put the top back on your container and then shake it up – I find this is the best way to distribute the dressing throughout the salad. Enjoy!

4 Comments

Filed under Lunch

The epiphany of homemade pizza

Hello friends, I have a sad confession to share with you. For 30 years, I’ve been scared to make my own pizza. Ok, maybe ‘scared’ isn’t the right word, but certainly ‘reluctant’, even ‘unwilling’. And, sure, there were probably some years somewhere between 0 and 10 that I didn’t think much one way or the other about making my own pizza. But since then it has always been a beloved and yet mystical substance that only restaurants (and occasionally my mom) could make. I rarely even considered making it myself.

Well, about three weeks ago I had an epiphany. A pizza epiphany. And ever since I have been a pizza-making fool.

broccoli rabe pizza

It all started a few weeks ago at the farmers market when the broccoli rabe showed up. I was SO excited. I absolutely love that Seattle farmers markets are open year-round, don’t get me wrong, but I had gotten a little board with the slim winter pickings, truth be told.

So, when the broccoli rabe showed up – one of the first spring veggies to appear in the stalls – I went a little crazy. One week, I bought three bunches of it on Saturday and by the following  Saturday there was still one poor, languishing bunch left in the fridge. I would not allow myself to waste this precious spring gift, however, so that day I cast a wider net than ever before in my search for recipes that use broccoli rabe. What I found…*drumroll please* was this recipe for Pizza w/Broccoli Rabe and Roasted Onions. It was right there all along, on one of my favorite food blogs! I decided to give it a try and let me tell you, it was a good decision.

broccoli rabe

I was flabbergasted at how good  it was. Flabbergasted and hooked. The next weekend I made pizza again, this time with different toppings. And you can guess the rest… Weeks worth of pizza later, I am here to share with you. I’m sorry I selfishly kept it to myself for so long. I could blame grad school, but it could also be (hypothetically speaking) that I was too busy eating pizza to type.

After several iterations of homemade pizza, I have isolated what it was about it that was frightening me: the crust. Pizza crust engenders such strong opinions – I’ve seen the argument of thin crust vs. thick crust nearly come to blows. Also, in all the movies and T.V. shows where you see people making pizza, they are always tossing it up in the air! I was always completely sure I am not coordinated enough to do that. Really though, it is surprisingly easy to make a crust that is the best of both worlds and will satisfy 90% of pizza eaters (100% in this house) without any tossing – or even very much kneading.

pizza crust

Now, I should make a small digression to note that I am aware that making pizza can be an art form. (My favorite pizza restaurant in Seattle, Delancey, certainly takes it to another level. I’ve also heard wonderful things about Serious Pie and am planning to go there as soon as humanly possible.) That is not what this pizza is, just so we’re clear. It is a totally acceptable substitute though – when you don’t want to go anywhere, want a home-cooked meal, or are considering just ordering delivery.

So, without further ado, let me introduce you to my current obsession. First, I give you an easy crust recipe that makes enough dough to make two perfectly sized pizzas (you can freeze half the dough for later use, it freezes beautifully). The crust is thin, but still soft and chewy, and slightly sweet. The perfect accompaniment to the crust is the broccoli rabe toppings I list below, but go nuts! Use any topping combination your heart desires, you will not be disappointed. Below the recipe, I also list some other pizza recipes/topping combos that want to try. If you have a good combo, let me know!

pizza!

Broccoli Rabe, Onion, & Olive Homemade Pizza

Adapted slightly from Smitten Kitchen and A Cozy Kitchen
Crust makes enough for 2 14(ish)-inch pizzas; toppings make enough for one piled-high pizza, or two slightly spartan pizzas.

I use instant yeast in my pizza dough because I like not having to wait as long. But, you can totally use regular active dry yeast in this recipe – you will just have to wait a little longer for the dough to rise. Also, a note on the olives: niçoise olives are the best for this combo, but I’ve used other types of cured olives and they all worked wonderfully.

Pizza Crust:
  • 1 cup warm water
  • 1 tbsp instant dry yeast
  • 1 tbsp sugar
  • 2 tbsp olive oil
  • 1 tsp honey
  • 2 1/4 cups all-purpose flour, sifted
  • 1/2 tsp salt

In a large bowl combine warm water, yeast, and sugar and stir to dissolve the yeast. Wait 5-10 minutes and allow the yeast to activate (you don’t have to do this with instant, but I’ve found that it moves things along).

Add the olive oil, and honey and stir until the honey dissolves. Then, add the flour and salt. Mix together until a dough forms.

Remove the dough from the bowl and, on a floured surface, knead 8-10 times or until it comes together into a smooth ball shape.

Place the dough into a greased bowl and cover with a clean, dampened towel. Place in a warm, draft-free place for 45 minutes, or until the dough doubles in size. Turn the dough out onto a floured surface and cut in half. At this point you can freeze one or both of the balls by wrapping tightly in plastic wrap. Roll one or both to desired size, then transfer to pizza pan.

Pizza Toppings & Assembly:
  • 4-5 spring onions OR 2 shallots, chopped
  • Salt and pepper to taste
  • Olive oil
  • 2 sprigs fresh thyme, leaves stripped off stems
  • 1 bunch broccoli rabe, roughly chopped (about 2 cups)
  • 1 clove garlic, minced
  • 1/4-1/2 tsp hot pepper flakes (depends on how spicy you want it – 1/2 tsp is pretty spicy, which we love)
  • Pizza dough for one recipe (above)
  • 1/2 cup fresh mozzarella cheese, sliced
  • 5-10 niçoise or greek olives, pitted and chopped
  • Juice from 1/2 a lemon

Preheat oven to 500°F.

Sauté onion over medium-low heat with enough olive oil to coat lightly, a pinch of salt, and the leaves of the thyme sprigs. Stir occasionally for 15-20 minutes until brown (even a little crispy is OK).

Heat a large sauté pan over high heat and coat it with olive oil. Add the broccoli rabe, season with salt, pepper, and the hot pepper flakes, and sauté until the broccoli rabe is tender (about 10 minutes). Add the garlic and sauté, tossing, for a 15-30 seconds.

While those two elements are working, roll out the pizza dough into a 12- to 14-inch disk of pizza dough and transfer to pizza pan. Lightly brush the dough with olive oil, leaving a 1/2-inch boarder dry.

Evenly sprinkle the cheese on the oiled surface. When the onions are done, spread them over the cheese, then top with the broccoli rabe and the olives. Drizzle about 1 tablespoon olive oil over the pizza.

Put the pizza in the oven and bake for 10 minutes, until the crust is brown and crisp. Remove the pizza from the oven, sprinkle with lemon juice, slice and serve.

Other scrumptious homemade pizza combos:

5 Comments

Filed under Food, Main Course

The summer farmers market bounty

Another wonderful thing about Seattle: the summer farmers market. It’s not that there weren’t farmers markets in DC, there were, and good ones. I was especially loyal to the one in downtown Falls Church, close to the last place I lived in the DC area. But the farmers markets I’ve been to in Seattle just seem so much more robust (ew, I hate that word)…buzzing…alive…bountiful. Not just in that there are seemingly more of them, but also each one is brimming with so many different types of produce, so many different farmers to choose from, each booth with something tastier than the last.

Beautiful carrots at the farmers market

I’ve also noticed that many, most really, of the booths are selling organic fruits and veggies. People ’round these parts are committed to their organic, local, seasonal produce – even many of the grocery stores are great for that. It’s quite impressive. I know it’s a trend that’s sweeping the nation, but I can tell it’s not a recent thing in the Pacific Northwest and I am reaping the benefits.

Abundance of heirloom tomatoes

I am also dazzled by the number and variety of other wares I find at the farmers market – things like local, handmade cheese, homegrown grains (I used wheat berries from Bluebird Grain Farms in the recipe below), fresh-caught seafood, and I’m only just beginning to explore everything it has to offer.

Homemade cheese at the farmers market

With all this enthusiasm, I’m sure it’s not a surprise to hear that I’ve gone a bit overboard the last couple times we’ve visited our local farmers market.  The closest one to where we live is the one in the U District, which is huge – much to my delight, but adding to my overindulgence.

U District Farmers Market

Oh my. When I go there I find myself in a state that is somewhere between heaven and the old game show Supermarket Sweep. If I actually got everything for free, like the players on Supermarket Sweep did, then it would be pure heaven!  But alas…

Berries!

It’s all just so hard to resist. I want to buy everything and I rationalize it by reminding myself that summer in Seattle doesn’t last long (at least that’s what long-time residents keep telling me) and that I need to take advantage. As a result, last week I was looking for recipes that would use as much of my farmers market haul as possible.

I had bookmarked a recipe from The Kitchn almost a year ago for a barley salad with golden beets, chard and feta, and it fit the bill perfectly. I know, it sounds a little wintry. But beets and chard are in season now, so why give them the cold shoulder until November? Nearly everything I used to make my adapted version of this recipe came from the U District Farmers Market.

Golden beets from the farmers market

The flavors and textures in this dish burst when you eat it. The sweet, earthiness of the beets and chard, the chewiness of the grains, the salty tang of the feta cheese. The combination of these ingredients is magical to a veggie-lover like me. Try it out and I’m sure you will agree.  I will be back to corn and stone fruit tomorrow, don’t you worry. For now, it’s all about this warm, satisfying salad.

Finished bowl of yumminess

Golden Beet and Wheat Berry Salad with Rainbow Chard

Adapted from The Kitchn
Makes about 5 cups

You can really play fast and loose with this recipe, as I did in adapting it to my tastes. For the greens, you can use kale, beet greens, or spinach (though I would cook them for less time if I were to use spinach) if you don’t have chard. For the grains, you can use barley as The Kitchn recipe suggests, but I used wheat berries and I also think that farro would be lovely. For the onion element, I cooked white onion instead of adding raw (though soaked) red onion because I just don’t like raw onion. I also omitted the scallions in the original recipe because I didn’t have any, and – I must admit – used lime juice instead of lemon juice because I didn’t have any lemons. All of this is just to say that this recipe is a prime candidate for experimenting and using what you happen to have in your kitchen – it will taste fabulous no matter what!

  • 1 cup dry hard white wheat berries
  • 3 large golden beets, tops removed
  • 1 bunch rainbow chard, washed
  • 3 tablespoons lemon juice (or lime juice, if you must), divided
  • 1 small white or yellow onion, diced
  • 4 ounces feta, crumbled
  • 3 tablespoons extra-virgin olive oil
  • salt and pepper to taste

Heat the oven to 450-degrees.

Bring 3 cups of salted water to a boil. Add the wheat berries. Reduce to a simmer and cook, uncovered, for approximately 45 minutes, or until they are soft. Drain when done and set aside.

Loosely wrap the beets in foil and roast in the oven until they are just fork tender – about 45 minutes. Peel the beets while they are still warm – I find the edge of a fork works brilliantly to just scrape the skin off. Once peeled, dice the beets into 1-inch cubes.

Meanwhile, prepare the chard. Strip off the leaves and tear them into bite-sized pieces. Cut the stems into bite-sized pieces.

Heat 1 tablespoon of olive oil in a skillet over medium heat. Sauté the chard stems and diced onion until they start to brown a bit around the edges. Add the torn chard leaves, half of the lemon juice (1 1/2 tablespoons), and a big pinch of salt. Cover and cook the chard until it is bright green and has wilted down, stirring occasionally (about 8 minutes).

Once everything is cooked, combine wheat berries, beets, chard and onion mixture, and feta in a large mixing bowl. Whisk together the remaining lemon juice and 2 tablespoons of olive oil, and drizzle this vinaigrette over the salad. Stir to evenly coat all the ingredients.

Taste and season with salt as needed, and pepper to taste. You can serve immediately, but if you can wait it’s good to let it sit for 15-20 minutes so that the wheat berries can absorb the liquid. Serve at room temperature.

5 Comments

Filed under Food, Main Course